

Currently Empty: $0.00


Introduction
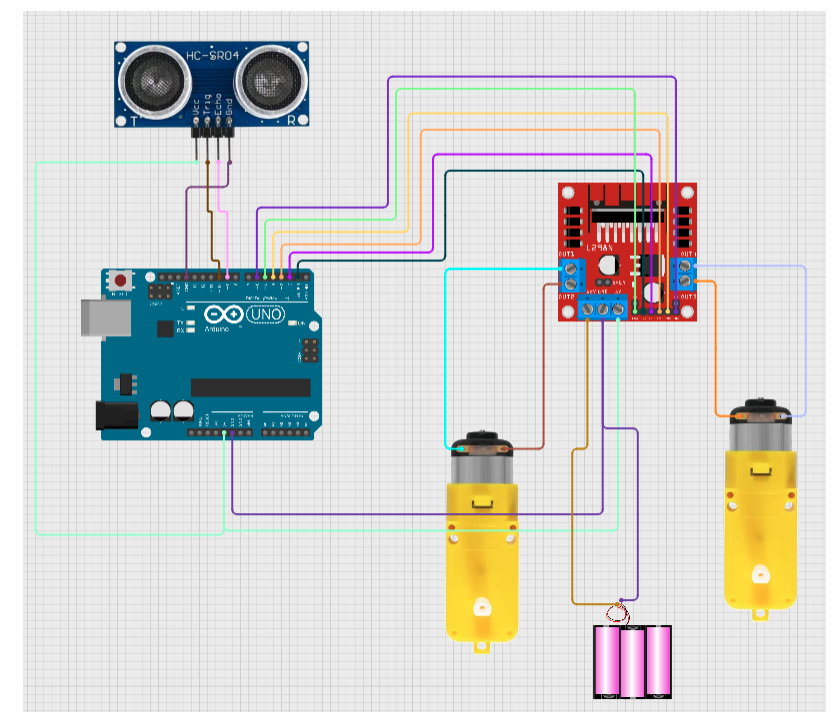
This project combines an Arduino, HC-SR04 ultrasonic sensor, and L298N motor driver to create a two-wheel drive robot car that detects and avoids obstacles automatically.
It’s perfect for learning about sensors, motor control, and autonomous robotics.
Overview
- Difficulty: Intermediate level — requires a basic understanding of Arduino concepts, components, and simple coding. Learners should already know how to connect sensors and upload basic sketches
- Estimated Time: 2–3 hours
- Skills Learned:
- Ultrasonic distance measurement
- Motor control with L298N
- Autonomous decision making in code
Components Required
| Item | Quantity | Notes |
|---|---|---|
| Arduino Uno (or compatible) | 1 | Main controller |
| HC-SR04 Ultrasonic Sensor | 1 | For obstacle detection |
| L298N Motor Driver Module | 1 | To control DC motors |
| DC Gear Motors | 2 | For driving wheels |
| Robot Car Chassis | 1 | With wheels & motor mounts |
| Caster Wheel | 1 | For front balance |
| Jumper Wires | As needed | Male-to-male & male-to-female |
| Battery Pack (6–12V) | 1 | To power motors |
| Breadboard (optional) | 1 | For easy wiring |
Circuit Connections
Ultrasonic Sensor (HC-SR04):
- VCC → 5V on Arduino
- GND → GND
- TRIG → Digital pin 9
- ECHO → Digital pin 10
L298N Motor Driver:
- ENA → Pin 5 (PWM)
- IN1 → Pin 4
- IN2 → Pin 3
- IN3 → Pin 2
- IN4 → Pin 7
- ENB → Pin 6 (PWM)
- Motor Power (12V) → Battery +
- GND → Battery - and Arduino GND
Motors:
- Motor A → OUT1 & OUT2
- Motor B → OUT3 & OUT4
Arduino Code
#define TRIG 9
#define ECHO 10
#define ENA 5
#define IN1 4
#define IN2 3
#define IN3 2
#define IN4 7
#define ENB 6

long duration;
int distance;

void setup() {
  pinMode(TRIG, OUTPUT);
  pinMode(ECHO, INPUT);
  pinMode(ENA, OUTPUT);
  pinMode(ENB, OUTPUT);
  pinMode(IN1, OUTPUT);
  pinMode(IN2, OUTPUT);
  pinMode(IN3, OUTPUT);
  pinMode(IN4, OUTPUT);
  Serial.begin(9600);
}

void loop() {
  // Measure distance
  digitalWrite(TRIG, LOW);
  delayMicroseconds(2);
  digitalWrite(TRIG, HIGH);
  delayMicroseconds(10);
  digitalWrite(TRIG, LOW);

  duration = pulseIn(ECHO, HIGH);
  distance = duration * 0.034 / 2;
  Serial.println(distance);

  if (distance < 20 && distance > 0) {
    // Obstacle detected — stop and turn
    stopMotors();
    delay(300);
    turnRight();
    delay(600);
  } else {
    // No obstacle — move forward
    moveForward();
  }
}

void moveForward() {
  digitalWrite(IN1, HIGH);
  digitalWrite(IN2, LOW);
  digitalWrite(IN3, HIGH);
  digitalWrite(IN4, LOW);
  analogWrite(ENA, 180);
  analogWrite(ENB, 180);
}

void stopMotors() {
  analogWrite(ENA, 0);
  analogWrite(ENB, 0);
}

void turnRight() {
  digitalWrite(IN1, HIGH);
  digitalWrite(IN2, LOW);
  digitalWrite(IN3, LOW);
  digitalWrite(IN4, HIGH);
  analogWrite(ENA, 180);
  analogWrite(ENB, 180);
}
Assembly Steps
- Prepare Chassis — Mount motors, wheels, and caster wheel.
- Install Components — Attach Arduino, L298N, and ultrasonic sensor.
- Wire Connections — Follow the wiring table above.
- Upload Code — Use Arduino IDE to upload.
- Test — Place an object in front and observe the car turning away.
Tips
- Adjust the distance threshold in code to control reaction speed.
- Use rechargeable Li-ion batteries for better performance.
- Secure wires to avoid tangling with wheels.